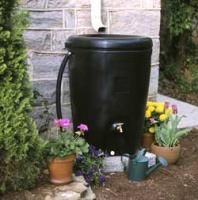
Rain Barrels
Recycling the water off your roof is a great way to get FREE water for your lawn and garden and help the environment as well.
 |
During a moderate, 1 inch storm event over a 24-hour period, over 700 gallons of water will run off the average roof of 1200 square feet. That is equivalent to approximately 14 bath tubs!
Storm water runoff from roofs, driveways, sidewalks, and lawns carries chemicals, solvents, salts, pet waste into the storm sewer and eventually into our streams, lakes and rivers. You can help prevent their subsequent pollution by keeping storm water on your property. You can accomplish this by creating rain gardens and using rain barrels.
You can purchase ready made rain barrels or make one of your own.
If you decide to make your own, following are some points to remember:
- Be sure the barrel originally contained food quality ingredients.
- The barrel should have a top or lid of some sort that is on tight enough so animals cannot get it off and fall into the barrel and drown.
Be sure to put a screen on the intake hole to filter material going in and prevent it from becoming a mosquito hatchery.
Instructions for Making a Rain Barrel
Making a rain barrel is as easy as 1, 2, 3.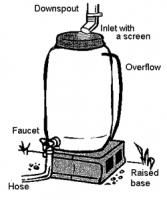
Getting Started
- Obtain a 55-gallon food grade or other heavy-duty plastic barrel.
- If it previously had food or any other non-toxic product in it, rinse your barrel out thoroughly. Avoid using bleach, as it is environmentally harmful. For an environmentally safe soap solution, use 2 teaspoons of castile soap and 2 teaspoons of vinegar or lemon juice for every gallon of water used to clean your barrel.
- Obtain 2 cinder blocks.
- Tool list (not pictured): gloves and safety goggles/glasses
- Tool list (pictured below): drill; 6" Hole Saw (can also use a saber, keyhole, or drywall saw); 29/32" drill bit; 3/4" pipe tap.
- Material list (not pictured): garden hose, soaker hose, or 3/4" ID clear plastic hose.
- Material list (pictured below): 6" louvered screen; 3/4" brass faucet; Teflon tape or all purpose caulk; 3/4" x 3/4" hose adapter.
Step 1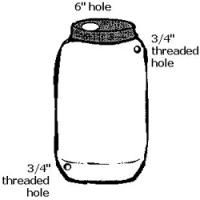
- Use a 6" hole saw, saber saw, keyhole saw, or drywall saw to cut a round 6” hole in the lid of your barrel.
- Drill two holes with a 29/32. drill bit, one towards the top for an overflow and one towards the bottom of the barrel for the faucet.
- Next use a 3/4" NPT pipe tap and twist it into the upper 29/32" hole, then repeat the same process for the lower 29/32" hole in order to create threads.
Step 2
- Thread hose adapter with Teflon tape.
- Twist in the threaded side of the hose adapter into the 3/4" threaded hole towa
 rds the top of the barrel.
 - Prepare the threaded side of the brass faucet by either of the 2 methods below:
- Wrapping it tightly with Teflon tape, make four or five rotations until all the threads are covered.
- Applying a thin ribbon of Kitchen and Bath All Purpose Adhesive Caulk, or similar sealant.
- Twist in the threaded and now-prepared end of the faucet into the 3/4" threaded hole towards the bottom of the barrel.
Step 3
- Cover the 6" hole in the top by placing the 6" louvered screen onto the barrel with the louvered side up and the screen side down.
- Slide a hose or 3/4"ID clear plastic hose onto the hose adapter at the top of barrel to direct the overflow water away from your home. The distance to an appropriate discharge area will determine the length of the hose. This is an important feature. A full barrel has the potential to spill additional water over the top and may cause localized erosion or excess water at the foundation of your home. By installing a long overflow you will avoid these potential problems.
- Place two cinder blocks under the selected downspout and place the barrel on this raised base.
- Cut your downspout about 4" above the top of the barrel, add the elbow from the bottom of the downspout and insert it into the freshly cut gutter downspout.
- Make any final adjustments to the base and barrel to make it level.
- Add a hose on the faucet, or keep it available to fill a watering can.
- njoy your rain barrel.
Tips for Using Your Rain Barrel
- Do not use collected water for drinking, cooking or bathing.
- Keep the lid secure so children or animals cannot fall into the barrel.
- To avoid constant overflow during the rainiest months, attach a soaker hose to the faucet and leave in the open position.
- If a moss killer has been recently applied to the roof let a couple of rainfall events go by before collecting runoff.
- The screened louver vent will prevent mosquitoes from breeding in your barrel.
- Consider joining multiple barrels at the overflow tube for additional capacity!
Tool List
- Drill
- 6" Hole Saw (A saber saw, keyhole saw, or drywall saw will also work.)
- 29/32" Drill Bit
- 3/4" NPT
- Pipe Tap
Material List
- 6" Louvered Screen
- 3/4" Brass Faucet
- Teflon Tape or All Purpose Caulk 3/4"
- Hose Adapter
- Wine Barrel to Rain Barrel Adaptor Kit